Quick tour
A two-minute look at the Kite interface, so you know where everything lives. Don't worry about the details here — each area has its own guide; this is just the map of the cockpit.
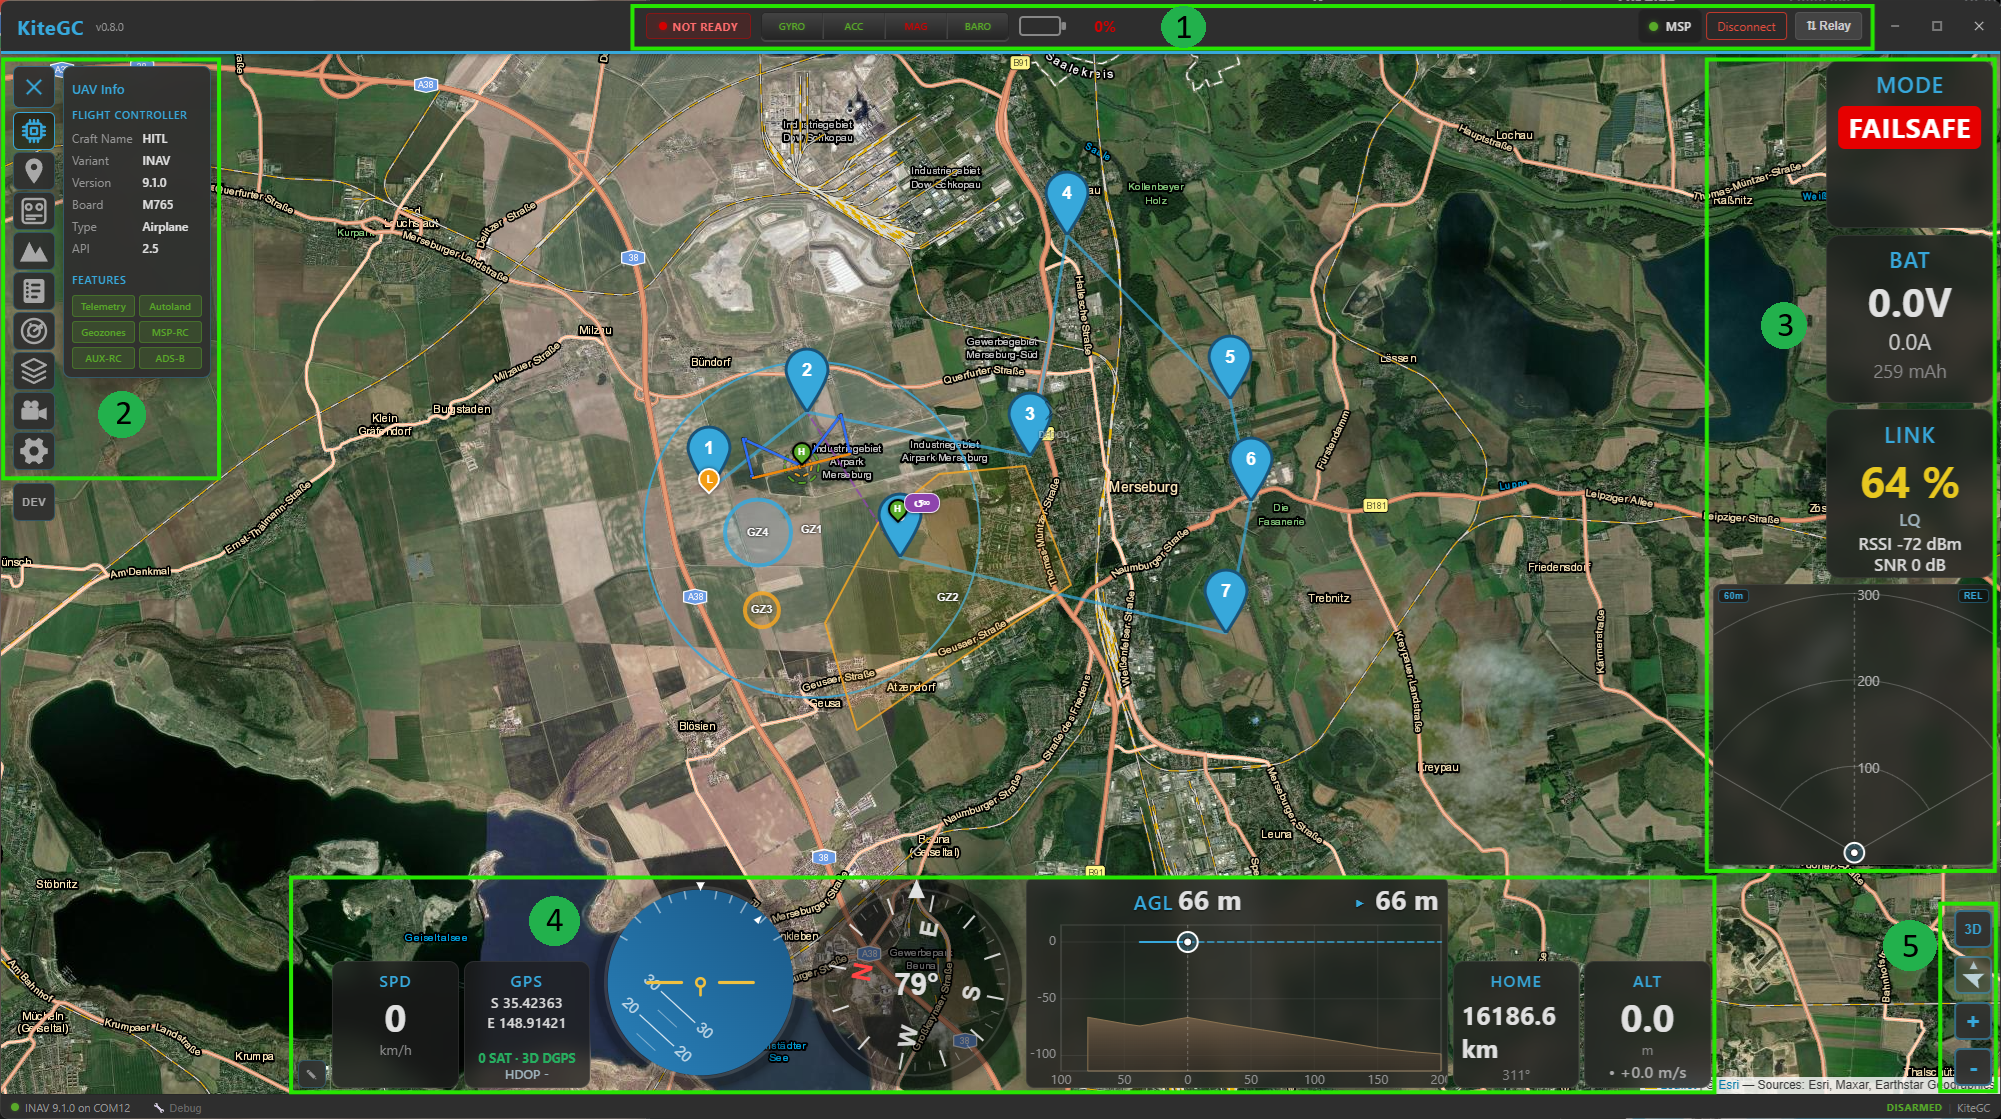
The main interface, with the numbered regions described below.
The layout at a glance
The window is built from a few fixed regions around a full-screen map:
| # | Region | What it's for |
|---|---|---|
| 1 | Top bar | Connecting, plus aircraft / sensor / battery status |
| 2 | Navigation rail & panel | The tool rail (left edge) and the panel it opens |
| 3 | Right widget dock | Flight instruments down the side |
| 4 | Bottom widget dock | Flight instruments along the bottom |
| 5 | Map controls | Switch 2D/3D, follow mode, zoom |
| — | Map | Fills the background: your aircraft, track, home and mission |
| — | Status bar | The thin strip at the very bottom: connection & arming state |
1 · Top bar
The command centre. From left to right:
- Brand & version — the Kite logo and the running version.
- Aircraft status (centre) — the arming indicator, a row of sensor-health tiles (gyro, acc, mag, baro, GPS, and rangefinder/airspeed when fitted — green = OK, amber = warning, red = fault), and the battery readout. Tiles only appear for sensors your craft actually reports, so the row adapts to the airframe.
- Connection controls (right) — protocol, transport and port while disconnected; once connected they're replaced by the live link status and a Disconnect button. See the Connecting guide.
- ⇅ Relay — opens the telemetry relay/forwarding dropdown.
- Window controls — minimise / maximise / close.
2 · Navigation rail & panels
The strip down the left edge is the navigation rail. Click an icon to open its panel; click it again (or the rail's toggle) to close. Only one panel is open at a time, and the map stays live behind it. Some tools appear only when relevant (e.g. Control only on an ArduPilot/PX4 link), so the rail stays uncluttered.
Each tool, at a glance — expand for a quick description and the link to its full guide:
UAV Info
Flight-controller identity (firmware variant, version, board) and live vehicle status — a quick read-out of what you're connected to and how it's doing.
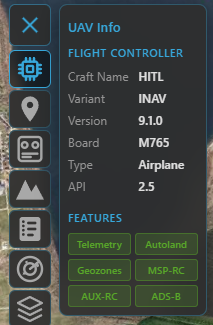
Details: Telemetry & display.
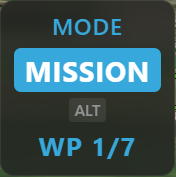
Mission
Plan a waypoint mission: add, edit and reorder waypoints, set altitudes (incl. AGL / terrain-following), generate survey patterns, undo/redo, and upload / download to the aircraft. Includes the reusable mission library.
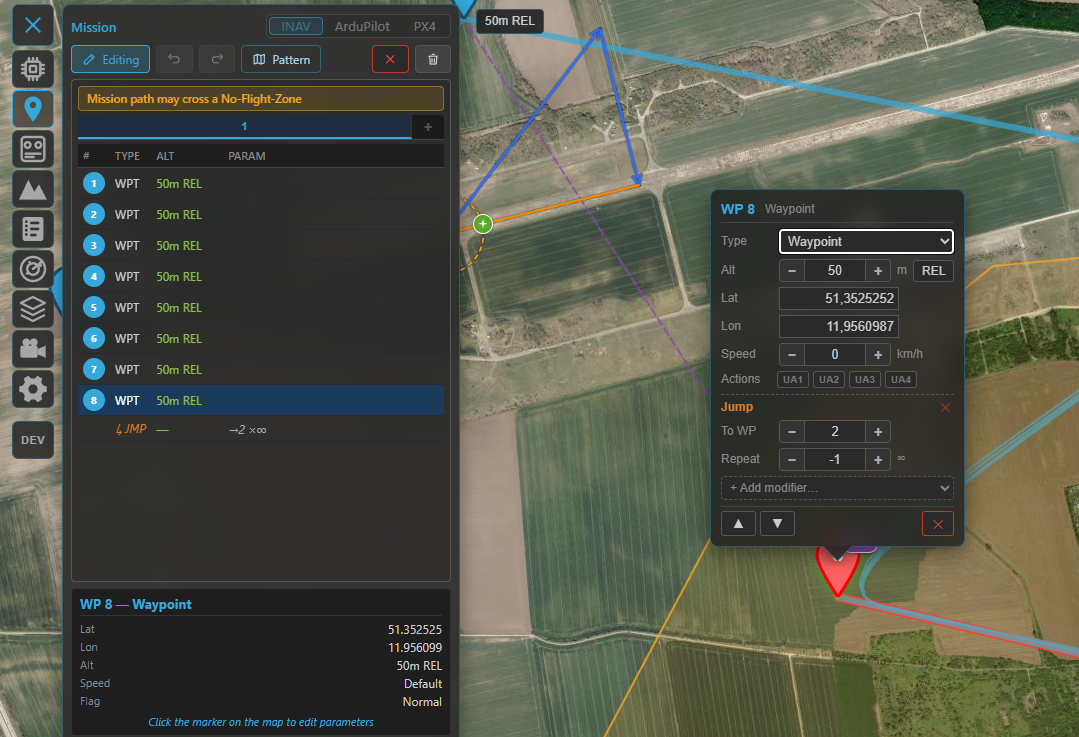
Details: Missions.
Control (ArduPilot / PX4)
Send vehicle commands over MAVLink — arm / disarm, change flight mode, take off, RTL, loiter and more. Only shown when connected to an ArduPilot or PX4 vehicle.
RC
Fly from the GCS with a gamepad or joystick: map your controller's axes/buttons to RC channels and manage control profiles. Only shown when RC control is enabled (and not on a passive telemetry link).
Details: RC control.
Terrain
A terrain-profile analysis of your planned mission or a recorded track — see the ground elevation beneath the route and check your above-ground clearance.
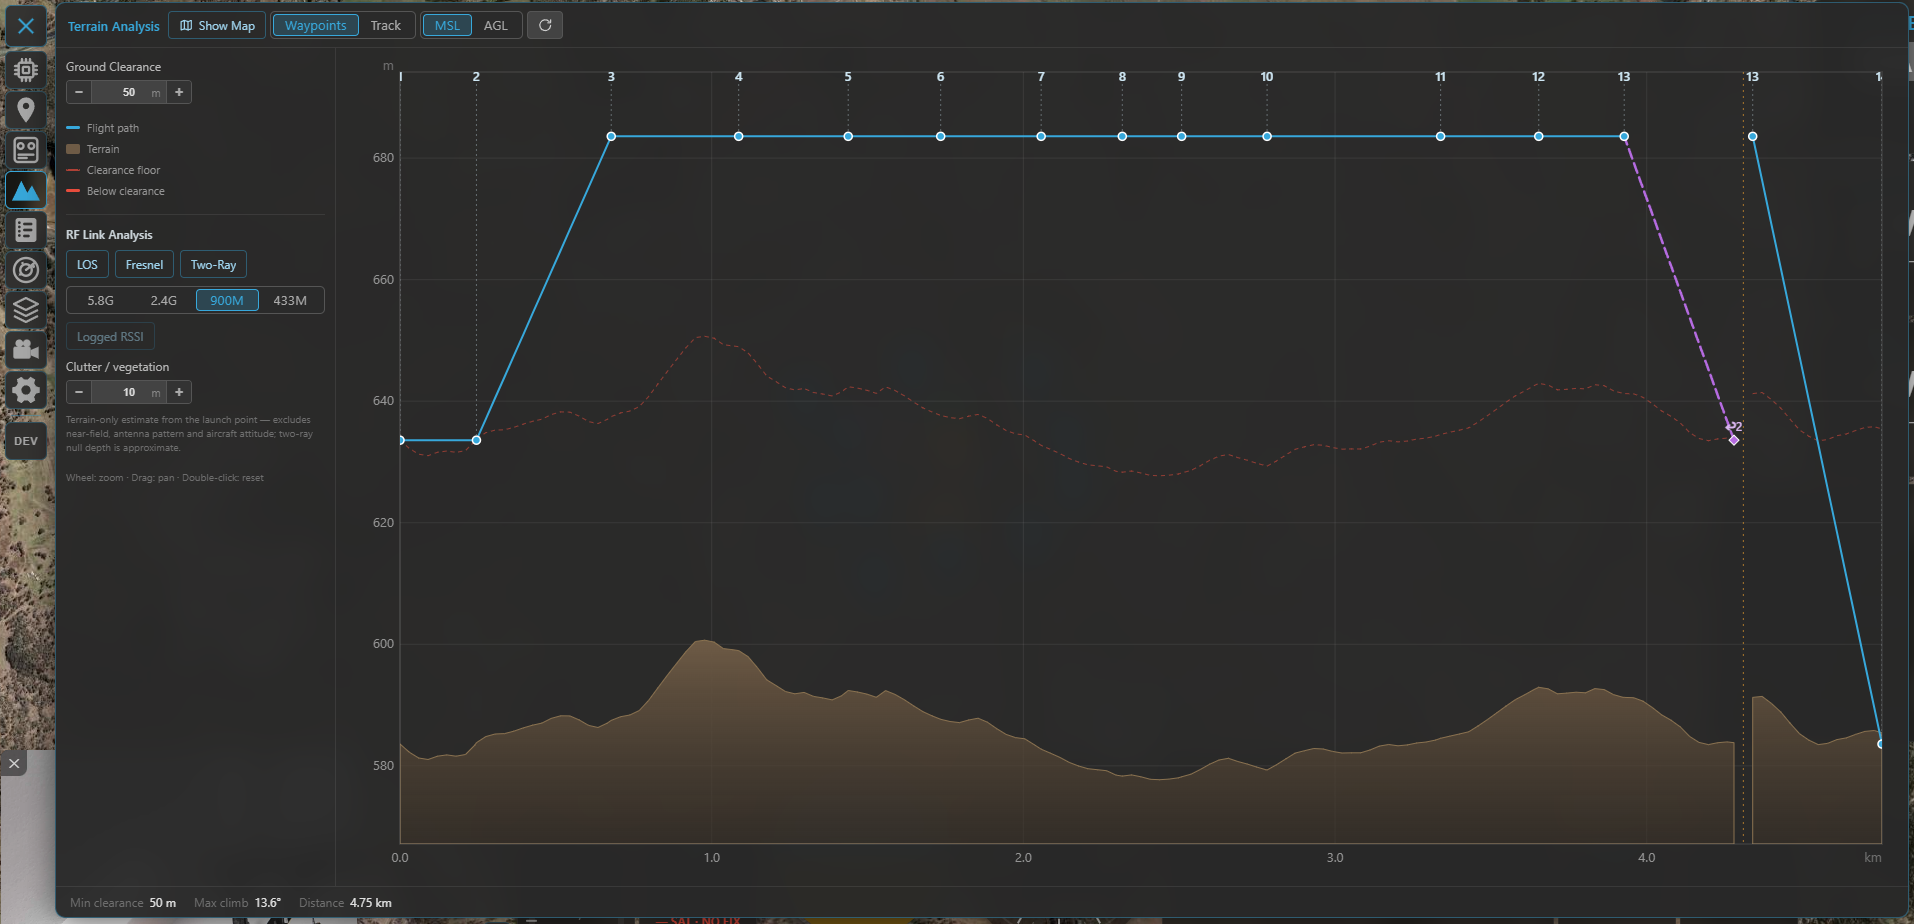
Details: Missions.
Logbook
Your flight history: automatic recordings with replay, plus import of INAV blackbox, ArduPilot
Dataflash, MAVLink .tlog and MWPTools raw-MSP logs. Add notes and weather, and reach the Vehicle
and Battery managers from here.

Radar
Foreign-vehicle radar — show nearby ADS-B (and other) traffic on the map, with proximity and conflict alerts. Only shown when radar is switched on.
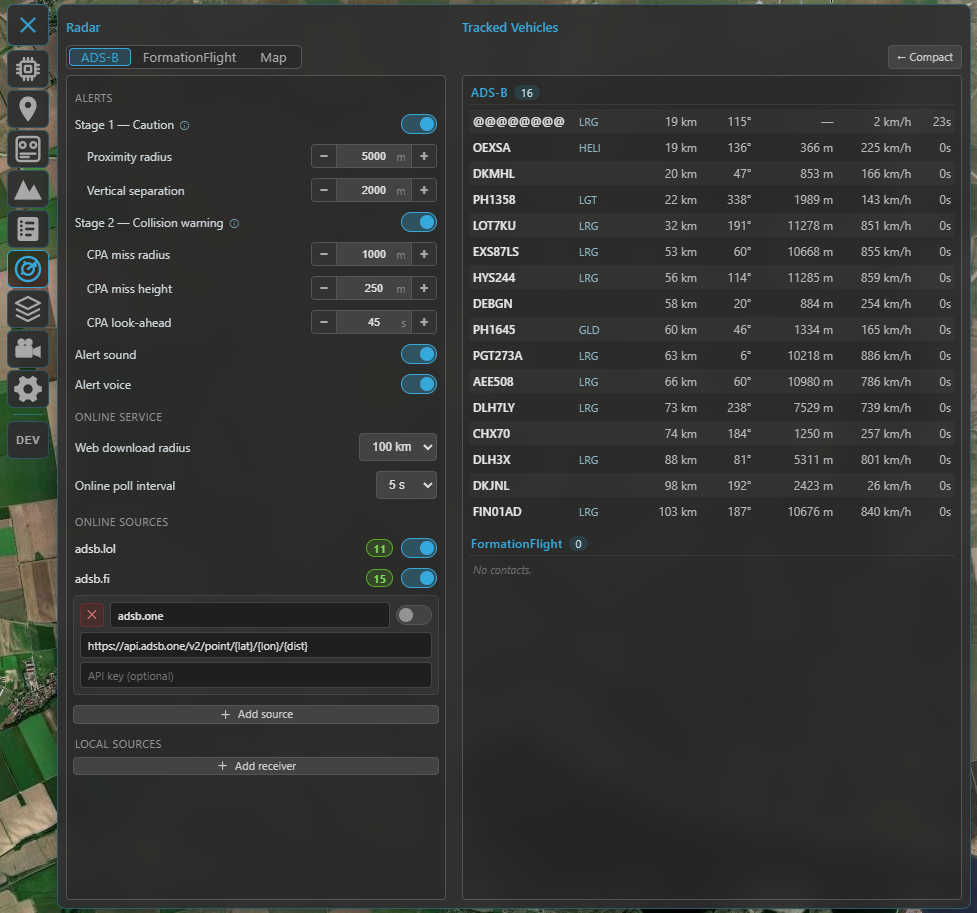
Details: Radar & ADS-B.
Airspace
Aeronautical overlays (airports, controlled airspace and obstacles), plus the editors for INAV geozones and ArduPilot/PX4 geofences. Shown when the overlay is on, or when a connected FC supports geozones/geofences.
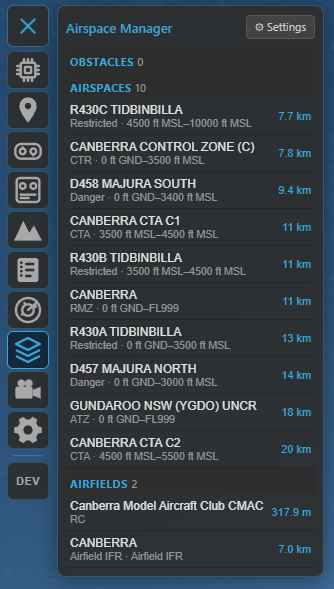
Details: Safety.
Video
Set up and watch a live RTSP video feed alongside (or behind) the map, with one-click map ⇄ video swapping.
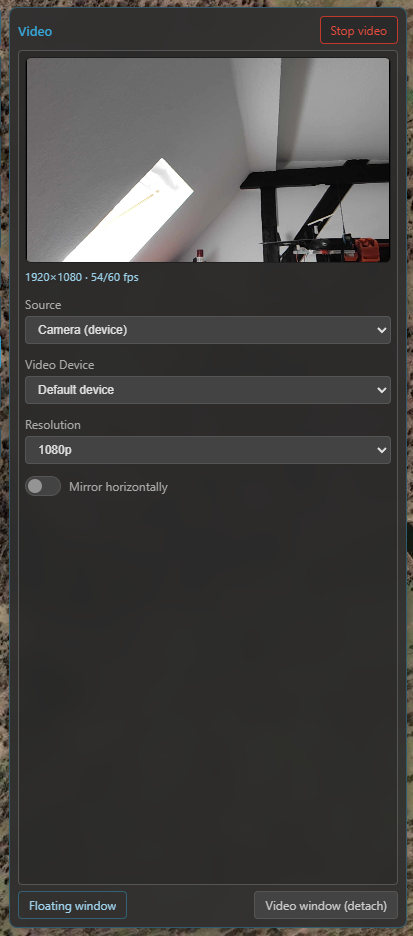
Details: Video.
Settings
Everything configurable — units, map provider, telemetry rates, flight logging, language, widget selection and more.
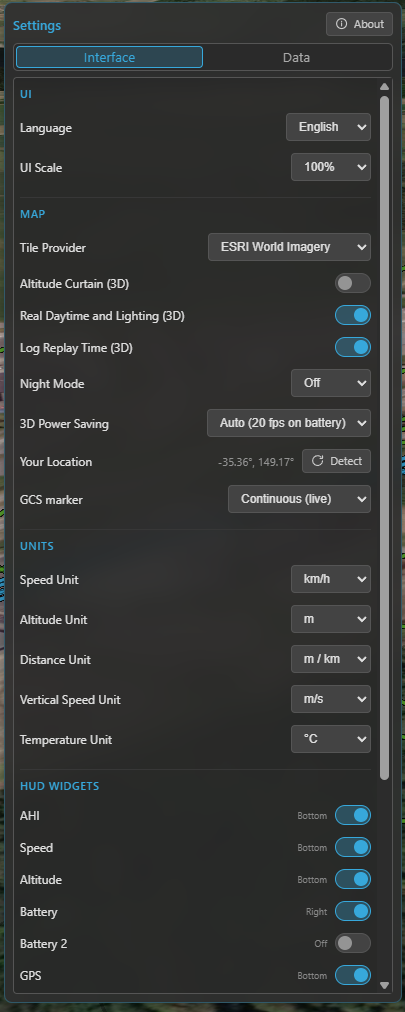
Details: Settings reference.
3 & 4 · Widget docks
Two docks hold your flight widgets (attitude, altitude, speed, compass, and more): the right dock (3) down the side, and the bottom dock (4) along the bottom.
Click the ✎ (edit) button by a dock to enter edit mode, then drag widgets to rearrange them or move them between docks. Choose which widgets appear in Settings → Interface. Widgets scale to fit the dock, and your layout (including which dock each sits in) is remembered between sessions. Every widget follows your global units and works the same live and in replay.
Each widget, at a glance — expand for what it shows and how it works:
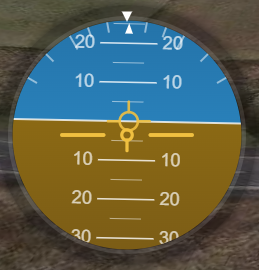
AHI — Artificial Horizon
A circular attitude indicator: the horizon line moves with pitch and banks with roll around a fixed aircraft symbol. A flight-path-vector marker shows where the aircraft is actually going — offset from the symbol by angle of attack (vertically) and crab (laterally) — smoothed so it reads cleanly.
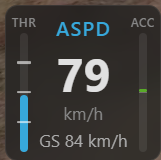
Speed
The big number is airspeed when the aircraft reports it (what matters in flight), with ground speed on a second line; without an airspeed sensor, ground speed is the primary number. A throttle bar (0–100 %, from the FC) sits on the left and a derived acceleration bar on the right (±4 m/s², estimated from the speed trend — no number, just a bipolar bar from centre).
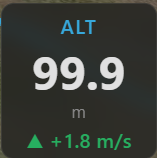
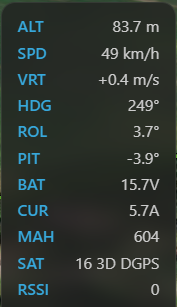
Altitude
The aircraft's altitude (barometric / navigation, relative to home), switching to km above 999 m to stay compact. Below it, a vario read-out with an ▲ / ▼ trend arrow and colour for climb / sink.
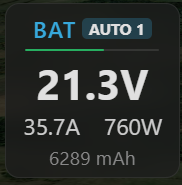
Battery
A charge bar (the FC's battery percentage, shown when the FC reports one) plus voltage, current, power (V × A) and charge drawn (mAh). On multi-battery ArduPilot / PX4 aircraft it shows one pack with an AUTO selector that follows the highest-draw pack (with a short hysteresis so it doesn't flicker), a low-battery safety override (jumps to the lowest pack once one drops below the Battery alert threshold), and manual pinning (click the BAT label to cycle AUTO → pack 1 → pack 2 → …). Single-battery setups (INAV) just show the one pack. The charge figure is the FC's percentage when available, otherwise the voltage (no guessed % from voltage). Add a second Battery 2 widget to watch two packs at once (e.g. a QuadPlane's forward and lift packs). See Batteries.
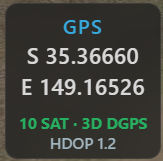
GPS
Latitude / longitude, satellite count, fix type (No fix / 2D / 3D / 3D DGPS, colour-coded) and HDOP.
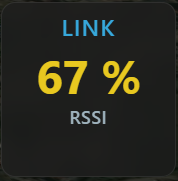
RC Link
An adaptive radio-link read-out — it shows whatever the active protocol provides and hides the rest: LQ (link quality), RSSI (in % and dBm) and SNR. What you get depends on the link: CRSF, SmartPort and INAV 9.1+ give the full set (LQ + RSSI %/dBm + SNR), while MAVLink (ArduPilot / PX4), LTM and INAV before 9.1 report RSSI only — so that's all the widget shows there. The primary value is colour-coded green / amber / red by strength.
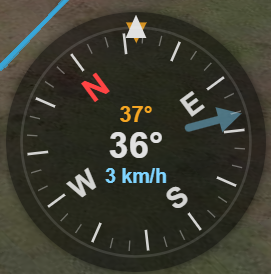
Compass
A rotating compass rose with the heading at the centre and a fixed top pointer. While moving, an amber course-over-ground bug rides the rim — the gap between it and the nose is your crab angle — and the COG value is read out above the heading. When the aircraft reports wind, a blue wind arrow (pointing downwind) and the wind speed appear.
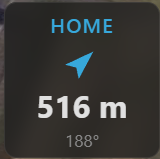
Home
A large arrow pointing to the home / launch point relative to the aircraft's heading, with the distance and bearing to home. Appears once the flight controller has set home.
Flight Mode
The current flight mode as a badge. Kite maps every stack's modes onto one protocol-agnostic model, so INAV, ArduPilot and PX4 read consistently: the exact mode name is always kept (e.g. Angle, Cruise, RTL, FBW-A, QLoiter), while the badge colour comes from the mode's category — the same colour scheme used to colour the flight track on the map. Roughly: stabilized = green, altitude-hold = yellow, position-hold = teal, cruise = orange, mission = blue, guided = blue, RTH / return = violet, launch / takeoff = magenta, land = orange, failsafe = red, manual = grey, acro = light grey.
INAV's (and PX4's) main mode + sub-modes are shown together: the primary mode is the badge, and any active modifiers (AltHold, Heading, HeadFree, Soaring, Autoland, …) appear as small chips beside it. During a mission the badge also shows the FC's current target as WP N/X.
Raw Telemetry
A compact numeric dump for when you want the raw figures at a glance: altitude, speed, vario, heading, roll, pitch, voltage, current, mAh, satellites and RSSI.
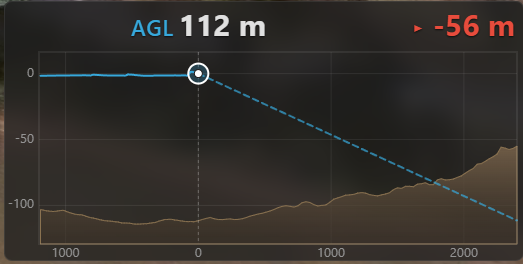
Live AGL
A forward-looking terrain-profile HUD (a wide widget). The left third shows the terrain you've flown over with the aircraft riding at its current height; the right two-thirds shows the estimated terrain ahead along your heading, with a dashed projected flight line so you can see a climb, descent or ground intersection coming. Centre read-outs give AGL and minimum clearance ahead (red when it goes negative). Works live and in replay.
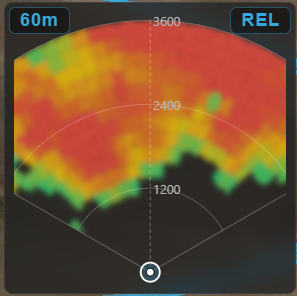
Terrain Radar
A top-down, track-up terrain-awareness display in the style of an airliner's EGPWS: a forward fan coloured by clearance against your altitude (red = at/above you → green = well below). Two independent ranges — the fan distance scales with speed, and a separate clearance colour scale (60 / 120 / 250 m, left button). A REL / PRED button (right) switches the reference between your current altitude and a sink-rate-predicted one.
Video
A live video feed embedded as a widget — an RTSP stream or a local capture device / camera (e.g. a USB capture card), sized to the stream's aspect ratio. Double-click it to swap the feed with the map. See Video.
5 · Map & its controls
The map fills the whole background and is always interactive — pan and zoom around it even with a panel open. A small cluster of buttons sits in one corner of the map (5):
- 2D / 3D — switch between the flat moving map and the full 3D globe. (The button shows the mode you'll switch to.)
- Follow mode — cycles Free → Follow → Heading-up: free panning, keep the aircraft centred, or centre and rotate the map to the aircraft's heading.
- Zoom + / − — zoom the map (the mouse wheel works too).
The 3D view has more of its own controls — see the 3D map guide.
Status bar
The thin strip along the very bottom:
- Left — a connection dot (green = connected, red = not) and, once connected, the firmware variant, version and port (e.g. INAV 8.0.0 on COM7).
- Right — the arming state (ARMED / DISARMED) while connected.
Where to go next
- Get linked up: Connecting.
- Make sense of the instruments: Telemetry & display.
- Plan a flight: Missions.